Rpi1: Difference between revisions
No edit summary |
(→Links) |
||
| (41 intermediate revisions by 2 users not shown) | |||
| Line 1: | Line 1: | ||
Project: | Project: Opensenses Pi | ||
Tecnologias e componentes: | Este projecto é a versão dois do projecto [[bio-rio]], melhorada para um rasberry pi Model 2 B. Controla o aquário e executa tarefas e calculo para os sistema da futuragora. Está inserido na VPN da Futuragora sendo apenas acessível dentro dessa rede. Está ligado a vários sensores que recolhem dados entre eles a temperatura do aquário e a exterior, a luminosidade e outros dados. Também, através de um módulo de 4 relés o raspberry pi controla rotinas na bomba de ar, filtro e luzes que desligam e ligam autmoaticamente. | ||
Por fim, uma ultima rotina que liga as luzes também liga a câmara e posteriormente recolhe um video de 3 segundos. Esse video é posteriormente enviado para o servidor que cria uma cápia diária. | |||
Página de controle: https://futuragora.pt/futurai/opensenses/pi | |||
==Tecnologias e componentes:== | |||
- Raspberry Pi | - Raspberry Pi | ||
- Relay | - Relay Board for arduino DFRobot | ||
- Pen wifi | - Pen wifi | ||
- InfraRed | - InfraRed | ||
GPI in use: | |||
GPIO 17 - Infra red | GPIO 17 - Infra red | ||
GPIO 23 - Infra red | |||
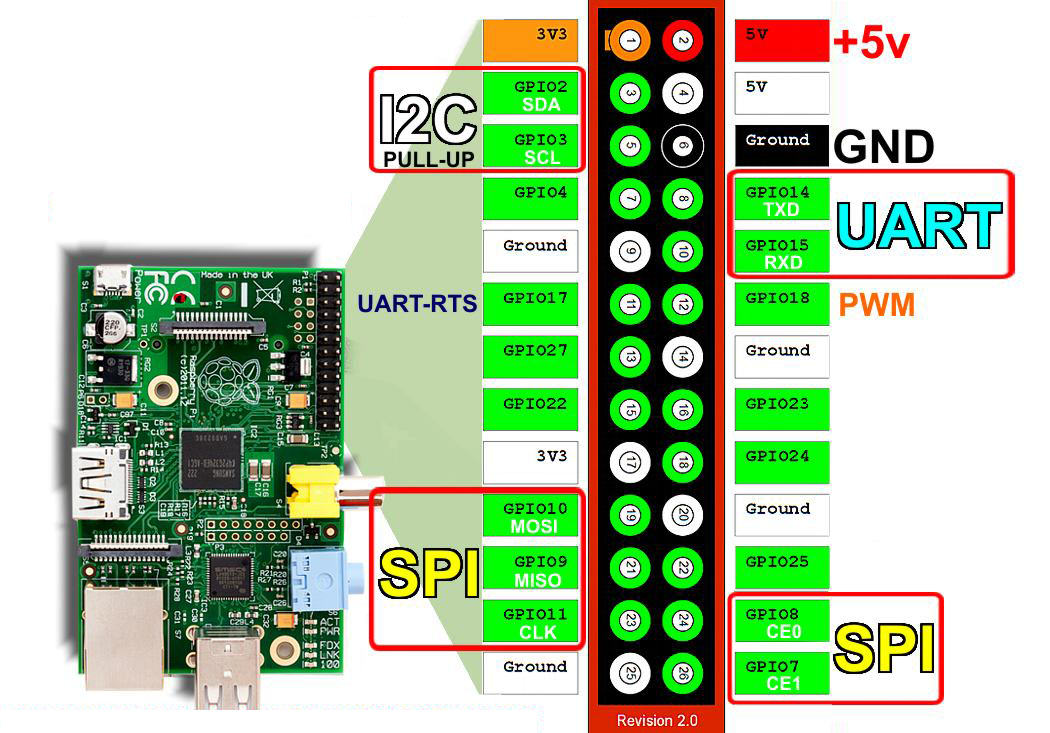
Mapa do GPIO: https://developer-blog.net/wp-content/uploads/2013/09/raspberry-pi-rev2-gpio-pinout.jpg | Mapa do GPIO: https://developer-blog.net/wp-content/uploads/2013/09/raspberry-pi-rev2-gpio-pinout.jpg | ||
==Software== | |||
apt-get update | |||
apt-get install -y openvpn whois screen | |||
apt-get install build-essential python-dev python-openssl git | |||
apt-get install python-setuptools | |||
nano /etc/hostname | |||
nano /etc/hosts | |||
==Mount USB== | |||
Para montar uma pen usb no rpi1: | |||
<pre> | |||
mkdir /mnt/usb | |||
blkid | |||
mount -t ntfs-3g /dev/sda1 /mnt/usb | |||
</pre> | |||
==Relay== | ==Relay== | ||
Re1 - 220v | |||
Re2 - Light | |||
re3 - 12v | |||
Control gpio pin with bash: | |||
<pre> | |||
#!/bin/sh | |||
# Set up GPIO 23 and set to input | |||
echo "23" > /sys/class/gpio/export | |||
echo "out" > /sys/class/gpio/gpio23/direction | |||
echo "24" > /sys/class/gpio/export | |||
echo "out" > /sys/class/gpio/gpio24/direction | |||
# Write output | |||
echo "1" > /sys/class/gpio/gpio23/value | |||
echo "1" > /sys/class/gpio/gpio24/value | |||
</pre> | |||
Control with python: | |||
<pre> | |||
sudo python | sudo python | ||
import RPi.GPIO as GPIO | import RPi.GPIO as GPIO | ||
| Line 21: | Line 72: | ||
GPIO.output(22, True) | GPIO.output(22, True) | ||
GPIO.output(25, False) | GPIO.output(25, False) | ||
</pre> | |||
<pre> | |||
import RPi.GPIO as GPIO | |||
# to use Raspberry Pi board pin numbers | |||
GPIO.setmode(GPIO.BOARD) | |||
# set up the GPIO channels - one input and one output | |||
GPIO.setup(11, GPIO.IN) | |||
GPIO.setup(12, GPIO.OUT) | |||
# input from pin 11 | |||
input_value = GPIO.input(11) | |||
# output to pin 12 | |||
GPIO.output(12, GPIO.HIGH) | |||
# the same script as above but using BCM GPIO 00..nn numbers | |||
GPIO.setmode(GPIO.BCM) | |||
GPIO.setup(17, GPIO.IN) | |||
GPIO.setup(18, GPIO.OUT) | |||
input_value = GPIO.input(17) | |||
GPIO.output(18, GPIO.HIGH) | |||
</pre> | |||
https://elinux.org/RPi_GPIO_Code_Samples | |||
http://openmicros.org/index.php/articles/94-ciseco-product-documentation/raspberry-pi/217-getting-started-with-raspberry-pi-gpio-and-python | |||
GPIO | ===Estado do GPIO=== | ||
<pre> | |||
cat /sys/class/gpio/gpio17/value | cat /sys/class/gpio/gpio17/value | ||
</pre> | |||
==Relay Specs== | |||
Relay Specs | |||
The module provides three connections labeled COM, NC and NO. NC stands for "NORMALLY CLOSED". This means that when the relay has no signal (LOW or 0V from an Arduino), the connected circuit wil be active; conversely, if you apply 5V or pull the pin HIGH, it will turn the connected circuit off. NO stands for "NORMALLY OPEN", and functions in the opposite way; when you apply 5V the circuit turns on, and at 0V the circuit turns off. Relays can replace a manual switch. Remove the switch and connect its wires toCOM and NO. When the relay is activated the circuit is closed and current can flow to the device you are controlling. Module Description: this module features an 250v 10A mounted on a 2 module TinkerKit board, one standard TinkerKit 3pin connector, one transistor, a green LED that signals that the module is correctly powered and an yellow LED that indicates when the relay is active. | The module provides three connections labeled COM, NC and NO. NC stands for "NORMALLY CLOSED". This means that when the relay has no signal (LOW or 0V from an Arduino), the connected circuit wil be active; conversely, if you apply 5V or pull the pin HIGH, it will turn the connected circuit off. NO stands for "NORMALLY OPEN", and functions in the opposite way; when you apply 5V the circuit turns on, and at 0V the circuit turns off. Relays can replace a manual switch. Remove the switch and connect its wires toCOM and NO. When the relay is activated the circuit is closed and current can flow to the device you are controlling. Module Description: this module features an 250v 10A mounted on a 2 module TinkerKit board, one standard TinkerKit 3pin connector, one transistor, a green LED that signals that the module is correctly powered and an yellow LED that indicates when the relay is active. | ||
| Line 74: | Line 135: | ||
echo 1 > /sys/class/gpio/gpio25/value | echo 1 > /sys/class/gpio/gpio25/value | ||
Projectos: | Projectos: | ||
Led: | Led: https://razzpisampler.oreilly.com/ch03.html | ||
==Cron== | |||
<pre> | |||
36 * * * * bash /home/pi/famon.sh │·················································· | |||
30 * * * * bash /home/pi/fasensor.sh │·················································· | |||
30 10 * * * python /home/pi/on1.py │·················································· | |||
30 11 * * * python /home/pi/off2.py │·················································· | |||
0 17 * * * python /home/pi/off1.py │·················································· | |||
0 18 * * * python /home/pi/on2.py │·················································· | |||
0 20 * * * python /home/pi/on1.py │·················································· | |||
59 23 * * * python /home/pi/off1.py │·················································· | |||
2 2 * * * python /home/pi/off1.py | |||
</pre> | |||
==Comandos== | |||
gpio readall | gpio readall | ||
apt-get install rpi.gpio | apt-get install rpi.gpio | ||
import RPi.GPIO as GPIO | import RPi.GPIO as GPIO | ||
nano /boot/config.txt | |||
nano /etc/modules | |||
==InfraRed== | ==InfraRed== | ||
| Line 162: | Line 187: | ||
$irrecord --list-namespace | $irrecord --list-namespace | ||
Finally, the irrecord program will process your input and create a configuration file ~/my_remote_control.conf as shown in the third screenshot. | Finally, the irrecord program will process your input and create a configuration file ~/my_remote_control.conf as shown in the third screenshot. | ||
http://ozzmaker.com/how-to-control-the-gpio-on-a-raspberry-pi-with-an-ir-remote/ | |||
gcc -o irelay irelay.c -lwiringPi -llirc_client | |||
==Webcams== | |||
sudo apt-get install v4l-utils | |||
v4l2-ctl --list-devices | |||
===Fish Cam=== | |||
* Não consigo correr o script dentro de um sh, melhor meti-o o comando num cron. | |||
Capture to OGV in High def: | |||
<pre> | |||
ffmpeg -y -f mjpeg -re -t 5 -i http://fa:fresco@192.168.2.228/video/mjpg.cgi?profileid=3 -r 25 -b 18550k -vcodec libtheora /root/fishcam.ogv | |||
</pre> | |||
Low res: | |||
<pre> | |||
ffmpeg -y -f mjpeg -re -t 5 -i http://fa:fresco@192.168.2.228/video/mjpg.cgi?profileid=3 -an -r 15 -acodec vorbis -vcodec libtheora fishcam.ogv | |||
</pre> | |||
Take a shot from video: | |||
<pre> | |||
ffmpeg -i ./fishcam.ogv -f mjpeg -vf "select=eq(n\,0)" -q:v 3 fishot.jpg | |||
</pre> | |||
Rpi script: | |||
picamshot.sh (takes a 1 minute video at 12PM) | |||
<pre> | |||
echo "1" > /sys/class/gpio/gpio23/value | |||
sleep 60 | |||
avconv -y -f mjpeg -re -t 60 -i http://fa:fresco@192.168.2.228/video/mjpg.cgi?profileid=3 -an -r 15 -acodec vorbis -vcodec libtheora /root/fishcam.ogv | |||
</pre> | |||
Server FA scripts: | |||
fishcam.sh | |||
<pre> | |||
ssh get file at 12:15PM | |||
</pre> | |||
fishot.sh (takes a shot and archive one copy at 12:30) | |||
<pre> | |||
avconv -y -i /home/futuragora/public_html/futurai/opensenses/pi/fishcam.ogv -f mjpeg -vf "select=eq(n\,0)" -q:v 3 /home/futuragora/public_html/futurai/opensenses/pi/fishot.jpg | cp /home/futuragora/public_html/futurai/opensenses/pi/fishot.jpg "/home/futuragora/public_html/futurai/opensenses/pi/fishots/fishot-`date +"%Y%m%d_%H%M%S"`.jpg" | |||
</pre> | |||
==Sensors== | |||
https://tutorials-raspberrypi.com/raspberry-pi-measure-humidity-temperature-dht11-dht22/ | |||
First of all, some packages have to be installed: | |||
sudo apt-get update | |||
sudo apt-get install build-essential python-dev python-openssl git | |||
Now the library for the sensors can be loaded. I use a pre-built Adafruit library that supports a variety of sensors: | |||
git clone https://github.com/adafruit/Adafruit_Python_DHT.git && cd Adafruit_Python_DHT | |||
sudo python setup.py install | |||
This creates a Python library that we can easily integrate into our projects. | |||
If everything went well, we can already read the temperature and humidity. The easiest way is to first use the demo files: | |||
cd examples | |||
sudo ./AdafruitDHT.py 11 4 | |||
The first parameter (11) indicates which sensor was used (22 for the DHT22) and the second, to which GPIO it is connected (not the pin number, but the GPIO number). This produces an output like the following: | |||
<pre> | |||
$ sudo ./AdafruitDHT.py 11 4 | |||
Temp=24.0* Humidity=41.0% | |||
./AdafruitDHT.py 11 4 | awk '$1 {print $2}' | awk '$1 {print $1}' RS="Humidity=" | awk '$1 {print $1}' RS="%" | |||
./AdafruitDHT.py 11 4 | awk '$1 {print $1}' | awk '$1 {print $1}' RS="Temp=" | awk '$1 {print $1}' RS="*" | |||
</pre> | |||
Attention: The sensors are only ready every two seconds. Be careful not to start a query every second. | |||
==Links== | ==Links== | ||
https://www.princetronics.com/how-to-read-433-mhz-codes-w-raspberry-pi-433-mhz-receiver/ | |||
https://www.allaboutcircuits.com/projects/create-an-arduino-controlled-battery-charger/ | https://www.allaboutcircuits.com/projects/create-an-arduino-controlled-battery-charger/ | ||
https://www.instructables.com/id/Record-Infrared-Codes-of-Any-Remote-Control-Unit-f/ | |||
https://ozzmaker.com/wp-content/uploads/2013/10/IRwiring2.png?csspreview=true | |||
https://ozzmaker.com/how-to-control-the-gpio-on-a-raspberry-pi-with-an-ir-remote/ | |||
https://www.modmypi.com/blog/raspberry-pis-remotes-ir-receivers | https://www.modmypi.com/blog/raspberry-pis-remotes-ir-receivers | ||
https://www.instructables.com/id/Add-Infrared-Interface-to-Your-Raspberry-Pi/ | |||
https://www.instructables.com/id/Install-and-Configure-Linux-Infrared-Remote-Contro/ | |||
https://www.instructables.com/id/Record-Infrared-Codes-of-Any-Remote-Control-Unit-f/ | |||
https://raspberrypi.stackexchange.com/questions/499/how-can-i-resize-my-root-partition | |||
Easy answer. Setup /etc/resolv.conf how you want it. | |||
Run | |||
Code: Select all | |||
sudo chattr +i /etc/resolv.conf | |||
Then it will never be changed. If you need to edit it, change +i to -i | |||
[[Iteaduino]] | |||
[[Category:Projectos_Futuragora]] | [[Category:Projectos_Futuragora]] | ||
Latest revision as of 06:24, 16 March 2024
Project: Opensenses Pi
Este projecto é a versão dois do projecto bio-rio, melhorada para um rasberry pi Model 2 B. Controla o aquário e executa tarefas e calculo para os sistema da futuragora. Está inserido na VPN da Futuragora sendo apenas acessível dentro dessa rede. Está ligado a vários sensores que recolhem dados entre eles a temperatura do aquário e a exterior, a luminosidade e outros dados. Também, através de um módulo de 4 relés o raspberry pi controla rotinas na bomba de ar, filtro e luzes que desligam e ligam autmoaticamente. Por fim, uma ultima rotina que liga as luzes também liga a câmara e posteriormente recolhe um video de 3 segundos. Esse video é posteriormente enviado para o servidor que cria uma cápia diária.
Página de controle: https://futuragora.pt/futurai/opensenses/pi
Tecnologias e componentes:
- Raspberry Pi - Relay Board for arduino DFRobot - Pen wifi - InfraRed
GPI in use:
GPIO 17 - Infra red GPIO 23 - Infra red
Mapa do GPIO: https://developer-blog.net/wp-content/uploads/2013/09/raspberry-pi-rev2-gpio-pinout.jpg
Software
apt-get update
apt-get install -y openvpn whois screen
apt-get install build-essential python-dev python-openssl git
apt-get install python-setuptools
nano /etc/hostname
nano /etc/hosts
Mount USB
Para montar uma pen usb no rpi1:
mkdir /mnt/usb
blkid
mount -t ntfs-3g /dev/sda1 /mnt/usb
Relay
Re1 - 220v
Re2 - Light
re3 - 12v
Control gpio pin with bash:
#!/bin/sh
# Set up GPIO 23 and set to input
echo "23" > /sys/class/gpio/export
echo "out" > /sys/class/gpio/gpio23/direction
echo "24" > /sys/class/gpio/export
echo "out" > /sys/class/gpio/gpio24/direction
# Write output
echo "1" > /sys/class/gpio/gpio23/value
echo "1" > /sys/class/gpio/gpio24/value
Control with python:
sudo python
import RPi.GPIO as GPIO
GPIO.setmode(GPIO.BCM)
GPIO.setup(22, GPIO.OUT)
GPIO.setup(25, GPIO.OUT)
GPIO.output(22, True)
GPIO.output(25, False)
import RPi.GPIO as GPIO

# to use Raspberry Pi board pin numbers
GPIO.setmode(GPIO.BOARD)

# set up the GPIO channels - one input and one output
GPIO.setup(11, GPIO.IN)
GPIO.setup(12, GPIO.OUT)

# input from pin 11
input_value = GPIO.input(11)

# output to pin 12
GPIO.output(12, GPIO.HIGH)

# the same script as above but using BCM GPIO 00..nn numbers
GPIO.setmode(GPIO.BCM)
GPIO.setup(17, GPIO.IN)
GPIO.setup(18, GPIO.OUT)
input_value = GPIO.input(17)
GPIO.output(18, GPIO.HIGH)
https://elinux.org/RPi_GPIO_Code_Samples
Estado do GPIO
cat /sys/class/gpio/gpio17/value
Relay Specs
The module provides three connections labeled COM, NC and NO. NC stands for "NORMALLY CLOSED". This means that when the relay has no signal (LOW or 0V from an Arduino), the connected circuit wil be active; conversely, if you apply 5V or pull the pin HIGH, it will turn the connected circuit off. NO stands for "NORMALLY OPEN", and functions in the opposite way; when you apply 5V the circuit turns on, and at 0V the circuit turns off. Relays can replace a manual switch. Remove the switch and connect its wires toCOM and NO. When the relay is activated the circuit is closed and current can flow to the device you are controlling. Module Description: this module features an 250v 10A mounted on a 2 module TinkerKit board, one standard TinkerKit 3pin connector, one transistor, a green LED that signals that the module is correctly powered and an yellow LED that indicates when the relay is active.
Relay 1: d2 verde echo 23 > /sys/class/gpio/export echo out > /sys/class/gpio/gpio23/direction echo 1 > /sys/class/gpio/gpio23/value echo 0 > /sys/class/gpio/gpio23/value
Relay 2 d7 laranja echo 23 > /sys/class/gpio/export echo out > /sys/class/gpio/gpio23/direction echo 1 > /sys/class/gpio/gpio23/value echo 0 > /sys/class/gpio/gpio23/value
Relay 3 d8 azul echo 24 > /sys/class/gpio/export echo out > /sys/class/gpio/gpio24/direction echo 1 > /sys/class/gpio/gpio24/value echo 0 > /sys/class/gpio/gpio24/value
Relay 4: d10 castanho 2 xLuzes do aquário echo 25 > /sys/class/gpio/export echo out > /sys/class/gpio/gpio25/direction echo 1 > /sys/class/gpio/gpio25/value
Projectos: Led: https://razzpisampler.oreilly.com/ch03.html
Cron
36 * * * * bash /home/pi/famon.sh                                                                                             │··················································
30 * * * * bash /home/pi/fasensor.sh                                                                                          │··················································
30 10 * * * python /home/pi/on1.py                                                                                            │··················································
30 11 * * * python /home/pi/off2.py                                                                                           │··················································
0 17 * * * python /home/pi/off1.py                                                                                            │··················································
0 18 * * * python /home/pi/on2.py                                                                                             │··················································
0 20 * * * python /home/pi/on1.py                                                                                             │··················································
59 23 * * * python /home/pi/off1.py                                                                                           │··················································
2 2 * * * python /home/pi/off1.py
Comandos
gpio readall
apt-get install rpi.gpio
import RPi.GPIO as GPIO
nano /boot/config.txt
nano /etc/modules
InfraRed
Infra Red: sudo apt-get install lirc
/etc/init.d/lirc stop
First test a remote control that you know to be working (example TV remote) to ensure that IR interface of the Raspberry Pi is working as expected.
On the terminal emulator
$mode2 -d /dev/lirc0
Point the working remote control at the Raspberry Pi
sudo service lirc stop
$cd ~
Run the program irrecord
$irrecord -d /dev/lirc0 my_remote_control.conf
When the irrecord program wizard ask you to map key names, open another terminal emulator and list all the possible key names available in LIRC so that you can choose the best one that fits your requirement. The output of the command below is shown in the screenshot
$irrecord --list-namespace
Finally, the irrecord program will process your input and create a configuration file ~/my_remote_control.conf as shown in the third screenshot.
http://ozzmaker.com/how-to-control-the-gpio-on-a-raspberry-pi-with-an-ir-remote/ gcc -o irelay irelay.c -lwiringPi -llirc_client
Webcams
sudo apt-get install v4l-utils
v4l2-ctl --list-devices
Fish Cam
- Não consigo correr o script dentro de um sh, melhor meti-o o comando num cron.
Capture to OGV in High def:
ffmpeg -y -f mjpeg -re -t 5 -i http://fa:fresco@192.168.2.228/video/mjpg.cgi?profileid=3 -r 25 -b 18550k -vcodec libtheora /root/fishcam.ogv
Low res:
ffmpeg -y -f mjpeg -re -t 5 -i http://fa:fresco@192.168.2.228/video/mjpg.cgi?profileid=3 -an -r 15 -acodec vorbis -vcodec libtheora fishcam.ogv
Take a shot from video:
ffmpeg -i ./fishcam.ogv -f mjpeg -vf "select=eq(n\,0)" -q:v 3 fishot.jpg
Rpi script:
picamshot.sh (takes a 1 minute video at 12PM)
echo "1" > /sys/class/gpio/gpio23/value
sleep 60
avconv -y -f mjpeg -re -t 60 -i http://fa:fresco@192.168.2.228/video/mjpg.cgi?profileid=3 -an -r 15 -acodec vorbis -vcodec libtheora /root/fishcam.ogv
Server FA scripts:
fishcam.sh
ssh get file at 12:15PM
fishot.sh (takes a shot and archive one copy at 12:30)
avconv -y -i /home/futuragora/public_html/futurai/opensenses/pi/fishcam.ogv -f mjpeg -vf "select=eq(n\,0)" -q:v 3 /home/futuragora/public_html/futurai/opensenses/pi/fishot.jpg | cp /home/futuragora/public_html/futurai/opensenses/pi/fishot.jpg "/home/futuragora/public_html/futurai/opensenses/pi/fishots/fishot-`date +"%Y%m%d_%H%M%S"`.jpg"
Sensors
https://tutorials-raspberrypi.com/raspberry-pi-measure-humidity-temperature-dht11-dht22/
First of all, some packages have to be installed:
sudo apt-get update
sudo apt-get install build-essential python-dev python-openssl git
Now the library for the sensors can be loaded. I use a pre-built Adafruit library that supports a variety of sensors:
git clone https://github.com/adafruit/Adafruit_Python_DHT.git && cd Adafruit_Python_DHT
sudo python setup.py install
This creates a Python library that we can easily integrate into our projects.
If everything went well, we can already read the temperature and humidity. The easiest way is to first use the demo files:
cd examples sudo ./AdafruitDHT.py 11 4
The first parameter (11) indicates which sensor was used (22 for the DHT22) and the second, to which GPIO it is connected (not the pin number, but the GPIO number). This produces an output like the following:
$ sudo ./AdafruitDHT.py 11 4
Temp=24.0*  Humidity=41.0%

./AdafruitDHT.py 11 4 | awk '$1 {print $2}' | awk '$1 {print $1}' RS="Humidity=" | awk '$1 {print $1}' RS="%"

./AdafruitDHT.py 11 4 | awk '$1 {print $1}' | awk '$1 {print $1}' RS="Temp=" | awk '$1 {print $1}' RS="*"
Attention: The sensors are only ready every two seconds. Be careful not to start a query every second.
Links
https://www.princetronics.com/how-to-read-433-mhz-codes-w-raspberry-pi-433-mhz-receiver/
https://www.allaboutcircuits.com/projects/create-an-arduino-controlled-battery-charger/
https://www.instructables.com/id/Record-Infrared-Codes-of-Any-Remote-Control-Unit-f/ https://ozzmaker.com/wp-content/uploads/2013/10/IRwiring2.png?csspreview=true https://ozzmaker.com/how-to-control-the-gpio-on-a-raspberry-pi-with-an-ir-remote/ https://www.modmypi.com/blog/raspberry-pis-remotes-ir-receivers https://www.instructables.com/id/Add-Infrared-Interface-to-Your-Raspberry-Pi/ https://www.instructables.com/id/Install-and-Configure-Linux-Infrared-Remote-Contro/ https://www.instructables.com/id/Record-Infrared-Codes-of-Any-Remote-Control-Unit-f/
https://raspberrypi.stackexchange.com/questions/499/how-can-i-resize-my-root-partition
Easy answer. Setup /etc/resolv.conf how you want it.
Run Code: Select all
sudo chattr +i /etc/resolv.conf Then it will never be changed. If you need to edit it, change +i to -i