Rpi1
Project: Open Senses Pi
Tecnologias e componentes: - Raspberry Pi - Relay 1, 2 - Pen wifi - InfraRed
GPIO 17 - Infra red
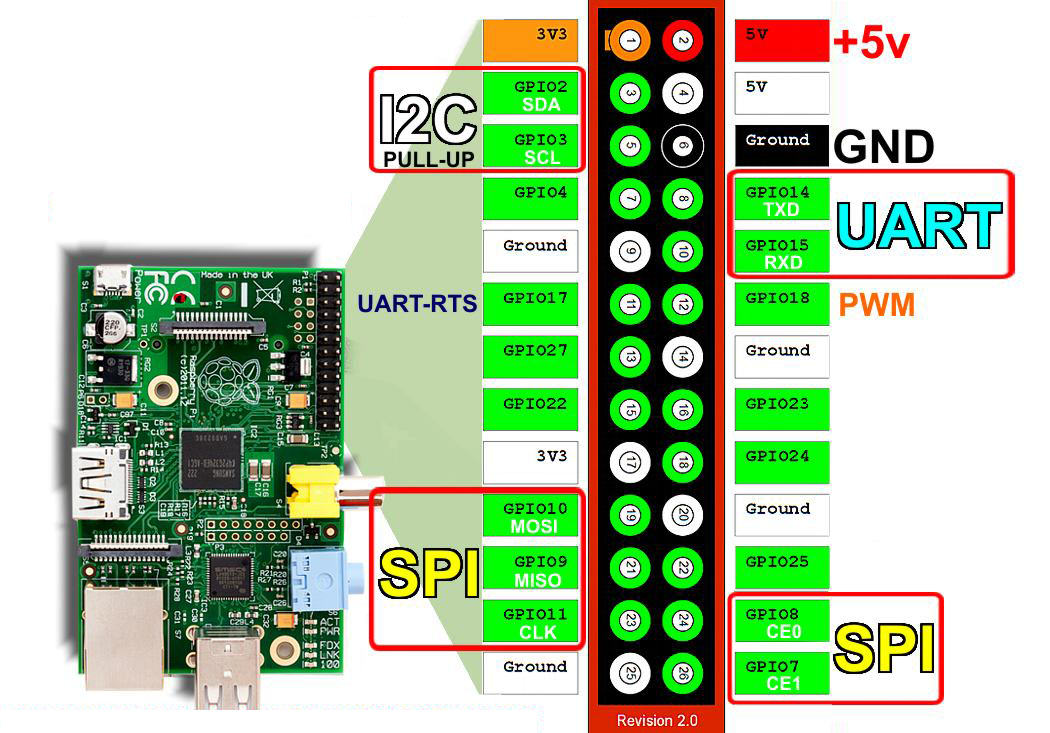
Mapa do GPIO: https://developer-blog.net/wp-content/uploads/2013/09/raspberry-pi-rev2-gpio-pinout.jpg
Mount
mkdir /mnt/usb blkid
mount -t ntfs-3g /dev/sda1 /mnt/usb
Relay
Control gpio pin with bash:
#!/bin/sh
# Set up GPIO 23 and set to input
echo "23" > /sys/class/gpio/export
echo "out" > /sys/class/gpio/gpio23/direction
# Write output
echo "1" > /sys/class/gpio/gpio23/value
Control with python:
sudo python
import RPi.GPIO as GPIO
GPIO.setmode(GPIO.BCM)
GPIO.setup(22, GPIO.OUT)
GPIO.setup(25, GPIO.OUT)
GPIO.output(22, True)
GPIO.output(25, False)
https://elinux.org/RPi_GPIO_Code_Samples
echo 23 > /sys/class/gpio/export echo out > /sys/class/gpio/gpio23/direction
echo 25 > /sys/class/gpio/export echo out > /sys/class/gpio/gpio25/direction
GPIO.setup(27, GPIO.IN)
GPIO.setup(23, GPIO.OUT)
GPIO.setup(24, GPIO.OUT)
GPIO.output(22, True)
GPIO.output(23, False)
View state: cat /sys/class/gpio/gpio17/value
http://ozzmaker.com/how-to-control-the-gpio-on-a-raspberry-pi-with-an-ir-remote/ gcc -o irelay irelay.c -lwiringPi -llirc_client
nano /boot/config.txt nano /etc/modules
Relay Specs:
The module provides three connections labeled COM, NC and NO. NC stands for "NORMALLY CLOSED". This means that when the relay has no signal (LOW or 0V from an Arduino), the connected circuit wil be active; conversely, if you apply 5V or pull the pin HIGH, it will turn the connected circuit off. NO stands for "NORMALLY OPEN", and functions in the opposite way; when you apply 5V the circuit turns on, and at 0V the circuit turns off. Relays can replace a manual switch. Remove the switch and connect its wires toCOM and NO. When the relay is activated the circuit is closed and current can flow to the device you are controlling. Module Description: this module features an 250v 10A mounted on a 2 module TinkerKit board, one standard TinkerKit 3pin connector, one transistor, a green LED that signals that the module is correctly powered and an yellow LED that indicates when the relay is active.
Relay 1: d2 verde echo 23 > /sys/class/gpio/export echo out > /sys/class/gpio/gpio23/direction echo 1 > /sys/class/gpio/gpio23/value echo 0 > /sys/class/gpio/gpio23/value
Relay 2 d7 laranja echo 23 > /sys/class/gpio/export echo out > /sys/class/gpio/gpio23/direction echo 1 > /sys/class/gpio/gpio23/value echo 0 > /sys/class/gpio/gpio23/value
Relay 3 d8 azul echo 24 > /sys/class/gpio/export echo out > /sys/class/gpio/gpio24/direction echo 1 > /sys/class/gpio/gpio24/value echo 0 > /sys/class/gpio/gpio24/value
Relay 4: d10 castanho 2 xLuzes do aquário echo 25 > /sys/class/gpio/export echo out > /sys/class/gpio/gpio25/direction echo 1 > /sys/class/gpio/gpio25/value
echo 25 > /sys/class/gpio/export
echo out > /sys/class/gpio/gpio25/direction
echo 22 > /sys/class/gpio/export
echo out > /sys/class/gpio/gpio22/direction
echo 1 > /sys/class/gpio/gpio23/value echo 1 > /sys/class/gpio/gpio25/value echo 1 > /sys/class/gpio/gpio24/value echo 1 > /sys/class/gpio/gpio17/value
echo 0 > /sys/class/gpio/gpio23/value echo 0 > /sys/class/gpio/gpio25/value echo 0 > /sys/class/gpio/gpio24/value echo 0 > /sys/class/gpio/gpio17/value
Relay 1
echo 23 > /sys/class/gpio/export
echo out > /sys/class/gpio/gpio23/direction
echo 1 > /sys/class/gpio/gpio23/value
echo 0 > /sys/class/gpio/gpio23/value
echo 22 > /sys/class/gpio/export echo out > /sys/class/gpio/gpio22/direction echo 1 > /sys/class/gpio/gpio22/value
echo 23 > /sys/class/gpio/export echo out > /sys/class/gpio/gpio23/direction echo 1 > /sys/class/gpio/gpio23/value
Projectos:
Led: http://razzpisampler.oreilly.com/ch03.html
ITEAD
http://wiki.iteadstudio.com/Iteaduino_Plus_A10/A20
Iteaduino Plus A10 Interface
1*10/100M Ethernet
1*SATA with External Power Jack
1*Micro-SD
1*HDMI
4*36pin GPIO
2*USB HOST
1*Mini USB OTG
1*Micro USB ?with 5V power supply)
1*FOCA
4*Grove
1*26pin Rasberry Pi compatible interface
1*3.5mm Audio Input
1*3.5mm Audio Output
gpio readall
apt-get install rpi.gpio
import RPi.GPIO as GPIO
InfraRed
Infra Red: sudo apt-get install lirc
/etc/init.d/lirc stop
First test a remote control that you know to be working (example TV remote) to ensure that IR interface of the Raspberry Pi is working as expected.
On the terminal emulator
$mode2 -d /dev/lirc0
Point the working remote control at the Raspberry Pi
sudo service lirc stop
$cd ~
Run the program irrecord
$irrecord -d /dev/lirc0 my_remote_control.conf
When the irrecord program wizard ask you to map key names, open another terminal emulator and list all the possible key names available in LIRC so that you can choose the best one that fits your requirement. The output of the command below is shown in the screenshot
$irrecord --list-namespace
Finally, the irrecord program will process your input and create a configuration file ~/my_remote_control.conf as shown in the third screenshot.
Links
http://www.princetronics.com/how-to-read-433-mhz-codes-w-raspberry-pi-433-mhz-receiver/
https://www.allaboutcircuits.com/projects/create-an-arduino-controlled-battery-charger/
http://www.instructables.com/id/Record-Infrared-Codes-of-Any-Remote-Control-Unit-f/ http://ozzmaker.com/wp-content/uploads/2013/10/IRwiring2.png?csspreview=true http://ozzmaker.com/how-to-control-the-gpio-on-a-raspberry-pi-with-an-ir-remote/ https://www.modmypi.com/blog/raspberry-pis-remotes-ir-receivers http://www.instructables.com/id/Add-Infrared-Interface-to-Your-Raspberry-Pi/ http://www.instructables.com/id/Install-and-Configure-Linux-Infrared-Remote-Contro/ http://www.instructables.com/id/Record-Infrared-Codes-of-Any-Remote-Control-Unit-f/